- 2024-12-25 17:23:35
- 8501 热度
- 0 评论
JUnit 是一个回归测试框架,被开发者用于实施对应用程序的单元测试,加快程序编制速度,同时提高编码的质量。
JUnit 测试框架具有以下重要特性:
测试工具
测试套件
测试运行器
测试分类
SpringBoot中引入junit,pom.xml中添加
<!-- ______________________________________________ junit -->
<dependency>
	<groupId>junit</groupId>
	<artifactId>junit</artifactId>
</dependency>
这里定义一个测试的基类,用于初始化和引入公用的模块。
这里初始化了一个操作Redis的接口类和测试SpringMVC的MockMvc类。
package com.example.demo;

import org.junit.jupiter.api.BeforeEach;
import org.junit.runner.RunWith;
import org.springframework.beans.factory.annotation.Autowired;
import org.springframework.boot.test.context.SpringBootTest;
import org.springframework.http.MediaType;
import org.springframework.test.context.junit4.SpringRunner;
import org.springframework.test.web.servlet.MockMvc;
import org.springframework.test.web.servlet.request.MockHttpServletRequestBuilder;
import org.springframework.test.web.servlet.request.MockMvcRequestBuilders;
import org.springframework.test.web.servlet.setup.MockMvcBuilders;
import org.springframework.web.context.WebApplicationContext;

import com.example.demo.redis.RedisDao;

/**
 * MVC测试基类
 */
@RunWith(SpringRunner.class)
@SpringBootTest(classes = DemoApplication.class)
public abstract class TestSupport {

	/**
	 * 模拟mvc测试对象
	 */
	protected MockMvc mvc;

	@Autowired
	protected RedisDao redisDao;

	/**
	 * web项目上下文
	 */
	@Autowired
	private WebApplicationContext webApplicationContext;

	/**
	 * 所有测试方法执行之前执行该方法
	 */
	@BeforeEach
	public void before() throws Exception {
		mvc = MockMvcBuilders.webAppContextSetup(webApplicationContext).build();
	}

	public MockHttpServletRequestBuilder post(String uri){
		return MockMvcRequestBuilders.post(uri).accept(MediaType.APPLICATION_JSON);
	}
	public MockHttpServletRequestBuilder get(String uri){
		return MockMvcRequestBuilders.get(uri).accept(MediaType.APPLICATION_JSON);
	}

//	@RunWith:标识为JUnit的运行环境;
//	@SpringBootTest:获取启动类、加载配置,确定装载Spring Boot;
//	@Test:声明需要测试的方法;
//	@BeforeClass:针对所有测试,只执行一次,且必须为static void;
//	@AfterClass:针对所有测试,只执行一次,且必须为static void;
//	@Before:每个测试方法前都会执行的方法;新版本为@BeforeEach
//	@After:每个测试方法前都会执行的方法;新版本为@ AfterEach
//	@Ignore:忽略方法;

//	Assert.assertEquals 对比两个值相等
//	Assert.assertNotEquals 对比两个值不相等
//	Assert.assertSame 对比两个对象的引用相等
//	Assert.assertArrayEquals 对比两个数组相等
//	Assert.assertTrue 验证返回是否为真
//	Assert.assertFlase 验证返回是否为假
//	Assert.assertNull 验证null
//	Assert.assertNotNull 验证非null

}
一个单元测试类执行顺序为:
@BeforeClass –> @Before –> @Test –> @After –> @AfterClass
每一个测试方法的调用顺序为:
@Before –> @Test –> @After
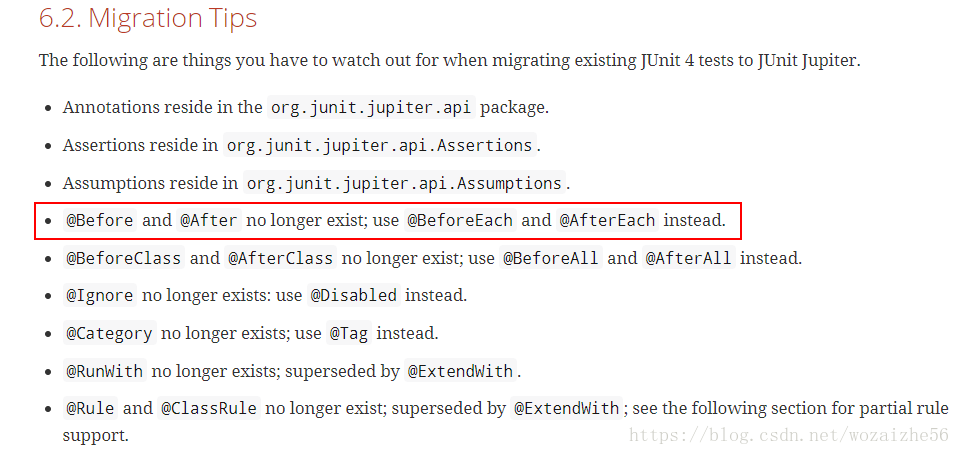
这里说一个坑,如果用低版本的junit时,使用的是@Before,但是你会发现现在不起作用了,那是因为新版本用@BeforeEach替换了,而且你使用也没有错误提示,只是不走初始化方法。
官方说明:

然后我们编写实际需要测试的接口处理类,这里测试了两个一个是Redis的使用一个是SpringMVC的调用。
package com.example.demo;

import org.junit.Assert;
import org.junit.jupiter.api.Test;
import org.springframework.http.MediaType;
import org.springframework.test.web.servlet.MvcResult;
import org.springframework.test.web.servlet.RequestBuilder;

/**
 * MVC测试
 */
class DemoApplicationTests extends TestSupport {

	@Test
	public void testRedis() throws Exception{
		redisDao.setKey("name","javacui");
		redisDao.setKey("age","35");
		System.out.println(redisDao.getValue("name"));
		System.out.println(redisDao.getValue("age"));
	}

	@Test
	public void testMVC01() throws Exception {
		// 传递的参数为JSON,这里不传递参数
		RequestBuilder request = post("/hello").contentType(MediaType.APPLICATION_JSON).content("");
		MvcResult mvcResult = mvc.perform(request).andReturn();
		int status = mvcResult.getResponse().getStatus();
		System.out.println("status is: " + status);
		Assert.assertTrue("错误,正确的返回值为200", status == 200);
		System.out.println(mvcResult.getResponse().getContentAsString());
	}

}
我特别讨厌网上发代码不发import的人。
配图

END
0 评论
留下评论
热门标签
- Spring(403)
- Boot(208)
- Spring Boot(187)
- Spring Cloud(82)
- Java(82)
- Cloud(82)
- Security(60)
- Spring Security(54)
- Boot2(51)
- Spring Boot2(51)
- Redis(31)
- SQL(29)
- Mysql(25)
- IDE(24)
- Dalston(24)
- MVC(22)
- JDBC(22)
- IDEA(22)
- mongoDB(22)
- Web(21)
- CLI(20)
- SpringMVC(19)
- Alibaba(19)
- Docker(17)
- SpringBoot(17)
- Git(16)
- Eclipse(16)
- Vue(16)
- ORA(15)
- JPA(15)
- Apache(15)
- Linux(14)
- HTTP(14)
- Mybatis(14)
- Oracle(14)
- jdk(14)
- Tomcat(14)
- Pro(13)
- XML(13)
- JdbcTemplate(13)
- OAuth(13)
- Nacos(13)
- Data(12)
- JSON(12)
- OAuth2(12)
- Myeclipse(11)
- stream(11)
- int(11)
- not(10)
- Bug(10)
- ast(9)
- maven(9)
- Map(9)
- Hystrix(9)
- Swagger(8)
- APP(8)
- Bit(8)
- API(8)
- session(8)
- Window(8)
- HTML(7)
- Github(7)
- JavaMail(7)
- Cache(7)
- File(7)
- mail(7)
- IntelliJ(7)
- windows(7)
- too(7)
- RabbitMQ(6)
- and(6)
- star(6)
- Excel(6)
- Log4J(6)
- pushlet(6)
- apt(6)
- read(6)
- Freemarker(6)
- WebFlux(6)
- JSP(6)
- Bean(6)
- error(6)
- nginx(6)
- Server(6)
- jar(6)
- ueditor(6)
- ehcache(6)
- UDP(6)
- JWT(5)
- rdquo(5)
- PHP(5)
- Struts(5)
- string(5)
- Syntaxhighlighter(5)
- script(5)
- Tool(5)
- Controller(5)
- swagger2(5)
- ldquo(5)
- input(5)

