用惯了 Redis ,很多人已经忘记了还有另一个缓存方案 Ehcache ,是的,在 Redis 一统江湖的时代,Ehcache 渐渐有点没落了,不过,我们还是有必要了解下 Ehcache ,在有的场景下,我们还是会用到 Ehcache。
今天無名就来和大家聊聊 Spring Boot 中使用 Ehcache 的情况。相信看完本文,大家对于[Spring Boot 操作 Redis,三种方案全解析! ]一文中的第二种方案会有更加深刻的理解。
Ehcache 也是 Java 领域比较优秀的缓存方案之一,Ehcache 这个缓存的名字很有意思,正着念反着念,都是 Ehcache,Spring Boot 中对此也提供了很好的支持,这个支持主要是通过 Spring Cache 来实现的。
Spring Cache 可以整合 Redis,当然也可以整合 Ehcache,两种缓存方案的整合还是比较相似,主要是配置的差异,具体的用法是一模一样的,就类似于 JDBC 和 数据库驱动的关系一样。前面配置完成后,后面具体使用的 API 都是一样的。
和 Spring Cache + Redis 相比,Spring Cache + Ehcache 主要是配置有所差异,具体的用法是一模一样的。我们来看下使用步骤。
项目创建
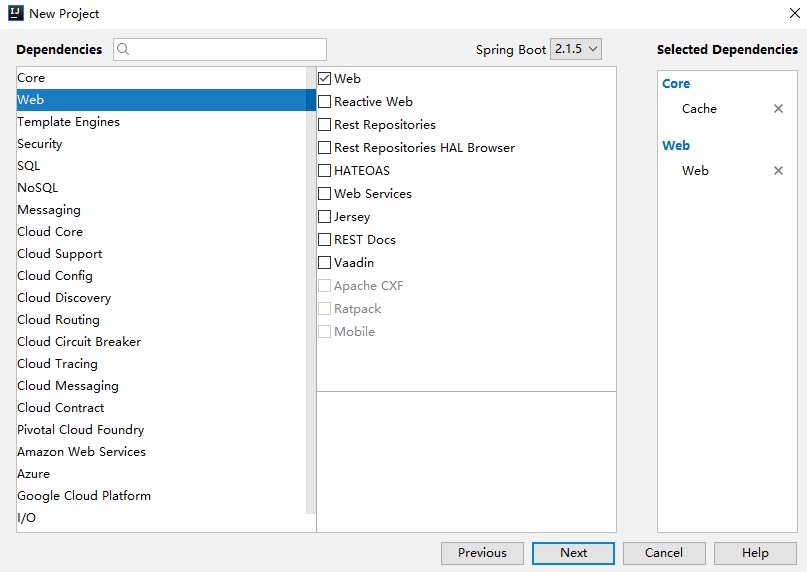
首先,来创建一个 Spring Boot 项目,引入 Cache 依赖:
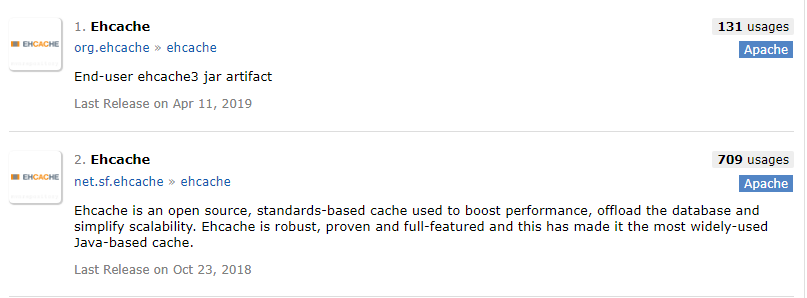
工程创建完成后,引入 Ehcache 的依赖,Ehcache 目前有两个版本:
这里采用第二个,在 pom.xml 文件中,引入 Ehcache 依赖:
1 2 3 4 5 6 7 8 9 10 11 12 13 14 15 <dependencies > <dependency > <groupId > org.springframework.boot</groupId > <artifactId > spring-boot-starter-cache</artifactId > </dependency > <dependency > <groupId > org.springframework.boot</groupId > <artifactId > spring-boot-starter-web</artifactId > </dependency > <dependency > <groupId > net.sf.ehcache</groupId > <artifactId > ehcache</artifactId > <version > 2.10.6</version > </dependency > </dependencies >
添加 Ehcache 配置
在 resources 目录下,添加 ehcache 的配置文件 ehcache.xml ,文件内容如下:
1 2 3 4 5 6 7 8 9 10 11 12 13 14 15 16 17 18 <ehcache > <diskStore path ="java.io.tmpdir/shiro-spring-sample" /> <defaultCache maxElementsInMemory ="10000" eternal ="false" timeToIdleSeconds ="120" timeToLiveSeconds ="120" overflowToDisk ="false" diskPersistent ="false" diskExpiryThreadIntervalSeconds ="120" /> <cache name ="user" maxElementsInMemory ="10000" eternal ="true" overflowToDisk ="true" diskPersistent ="true" diskExpiryThreadIntervalSeconds ="600" /> </ehcache >
配置含义:
name:缓存名称。
maxElementsInMemory:缓存最大个数。
eternal:对象是否永久有效,一但设置了,timeout将不起作用。
timeToIdleSeconds:设置对象在失效前的允许闲置时间(单位:秒)。仅当eternal=false对象不是永久有效时使用,可选属性,默认值是0,也就是可闲置时间无穷大。
timeToLiveSeconds:设置对象在失效前允许存活时间(单位:秒)。最大时间介于创建时间和失效时间之间。仅当eternal=false对象不是永久有效时使用,默认是0.,也就是对象存活时间无穷大。
overflowToDisk:当内存中对象数量达到maxElementsInMemory时,Ehcache将会对象写到磁盘中。
diskSpoolBufferSizeMB:这个参数设置DiskStore(磁盘缓存)的缓存区大小。默认是30MB。每个Cache都应该有自己的一个缓冲区。
maxElementsOnDisk:硬盘最大缓存个数。
diskPersistent:是否缓存虚拟机重启期数据。
diskExpiryThreadIntervalSeconds:磁盘失效线程运行时间间隔,默认是120秒。
memoryStoreEvictionPolicy:当达到maxElementsInMemory限制时,Ehcache将会根据指定的策略去清理内存。默认策略是LRU(最近最少使用)。你可以设置为FIFO(先进先出)或是LFU(较少使用)。
clearOnFlush:内存数量最大时是否清除。
diskStore 则表示临时缓存的硬盘目录。
注意
默认情况下,这个文件名是固定的,必须叫 ehcache.xml ,如果一定要换一个名字,那么需要在 application.properties 中明确指定配置文件名,配置方式如下:
1 spring.cache.ehcache.config=classpath:aaa.xml
开启缓存
开启缓存的方式,也和 Redis 中一样,如下添加 @EnableCaching 依赖即可:
1
2
3
4
5
6
7
@SpringBootApplication @EnableCaching public class EhcacheApplication public static void main (String[] args) SpringApplication.run(EhcacheApplication.class, args); } }
其实到这一步,Ehcache 就算配置完成了,接下来的用法,和無名之前讲 Redis 的文章一模一样。不过这里無名还是带大家使用下。
使用缓存
这里主要向小伙伴们介绍缓存中几个核心的注解使用。
@CacheConfig
这个注解在类上使用,用来描述该类中所有方法使用的缓存名称,当然也可以不使用该注解,直接在具体的缓存注解上配置名称,示例代码如下:
1
2
3
4
@Service @CacheConfig (cacheNames = "user" )public class UserService }
@Cacheable
这个注解一般加在查询方法上,表示将一个方法的返回值缓存起来,默认情况下,缓存的 key 就是方法的参数,缓存的 value 就是方法的返回值。示例代码如下:
1
2
3
4
5
@Cacheable (key = "#id" )public User getUserById (Integer id,String username) System.out.println("getUserById" ); return getUserFromDBById(id); }
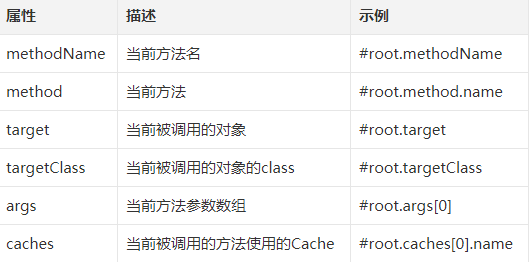
当有多个参数时,默认就使用多个参数来做 key ,如果只需要其中某一个参数做 key ,则可以在 @Cacheable 注解中,通过 key 属性来指定 key ,如上代码就表示只使用 id 作为缓存的 key ,如果对 key 有复杂的要求,可以自定义 keyGenerator 。当然,Spring Cache 中提供了root对象,可以在不定义 keyGenerator 的情况下实现一些复杂的效果,root 对象有如下属性:
也可以通过 keyGenerator 自定义 key ,方式如下:
1
2
3
4
5
6
7
@Component public class MyKeyGenerator implements KeyGenerator @Override public Object generate (Object target, Method method, Object... params) return method.getName()+Arrays.toString(params); } }
然后在方法上使用该 keyGenerator :
1
2
3
4
5
6
7
8
@Cacheable (keyGenerator = "myKeyGenerator" )public User getUserById (Long id) User user = new User(); user.setId(id); user.setUsername("lisi" ); System.out.println(user); return user; }
@CachePut
这个注解一般加在更新方法上,当数据库中的数据更新后,缓存中的数据也要跟着更新,使用该注解,可以将方法的返回值自动更新到已经存在的 key 上,示例代码如下:
1
2
3
4
@CachePut (key = "#user.id" )public User updateUserById (User user) return user; }
@CacheEvict
这个注解一般加在删除方法上,当数据库中的数据删除后,相关的缓存数据也要自动清除,该注解在使用的时候也可以配置按照某种条件删除( condition 属性)或者或者配置清除所有缓存( allEntries 属性),示例代码如下:
1
2
3
4
@CacheEvict ()public void deleteUserById (Integer id) }
总结
本文主要向大家了 Spring Boot 整合 Ehcache 的用法,其实说白了还是 Spring Cache 的用法。相信读完本文,大家对于 Redis + Spring Cache 的用法会有更深的认识。
本文案例我已上传到 GitHub ,欢迎大家 star:https://github.com/lenve/javaboy-code-samples
关于本文,有问题欢迎留言讨论。